Tuesday, November 20, 2012

Integration of Apache HTTP Server with WebLogic 11g


Follow the below steps to integrate Apache HTTP Server with WebLogic Server:


Step 1:
Install Apache HTTP Server. Refer the below documentation for installing Apache HTTP Server
http://httpd.apache.org

Step 2:
Copy Apache Proxy Plugin files(mod_wl_20.so or mod_wl_22.so) from WebLogic Server Plugin directory location (G:\Oracle\Middleware\wlserver_10.3\server\plugin\win\32)


Step 3:
Paste the above copied Apache Plugin files to APCHE_HOME\modules directory.
 

Step 4:
Go to the Apache Configuration file httpd.conf which is located APACHE_HOME\conf directory with the below information.


(a) Add the following line of code

      If you are using Apache 2.0 
                  LoadModule weblogic_module modules/mod_wl_20.so

      If you are using Apache 2.2
                 LoadModule weblogic_module modules/mod_wl_22.so


(b) Now add the If Module information inside  httpd.conf file to point to WebLogic Server or Cluster  Just add the following line of code at the bottom of the httpd.conf.

If you have a Single WebLogic Server Instance then use below configuration


<IfModule mod_weblogic.c>
WebLogicHost      <listen addressof WebLogic Server instance>
WebLogicport       <listen port>
MatchExpression /*
</IfModule>


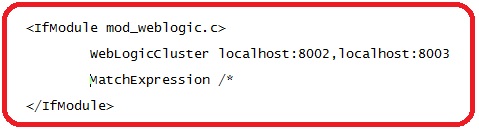
If you have a WebLogic Cluster then you can use the below configuration

<IfModule mod_weblogic.c>
WebLogicCluster      <MS1:port>,<MS2:port>
MatchExpression /*
</IfModule>


Stpe 5:
Verify the above added lines of code by using the  below command


Step 6:
Test the Apache Integration by accessing the application.


Monday, November 19, 2012

Configuring Data Sources in WebLogic Server 11g


Steps to Create and Configure  Data Sources


Step 1:
Login to Adminstration Console, in the Change Center  click Lock & Edit

Step2:
In the Domain Structure tree, expand Services, then select Data Sources

Step3:
On the Summary of Data Sources page, click New and select Generic Data Source

Step 4:
On the JDBC Data Sources Properties page, enter or select the following information:
    • Name -Enter a name for this JDBC data source.
    • JNDI Name - Enter the JNDI path to where this JDBC data source will be bound
    • Database Type - Select the type of database that you want to connect to.
              Click Next to continue
Step 5:
Select the database driver that you want to use to connect to database

Step 6:


  • On the Transaction Options page, follow these steps.
  • Depending on the driver you selected on the JDBC Data Source Properties page, you may not need to specify any of these options.

    Supports Global Transactions - Select this check box (the default) to enable global transaction support in this data source. 

    If you selected Supports Global Transactions, select an option for transaction processing: (available options vary depending on whether you select an XA driver or a non-XA driver)

    1. Two-Phase Commit - Select this option to enable standard XA processing. (This option is only available when you select an XA JDBC driver to make database connections)
    2. Logging Last Resource - Select this option to enable a non-XA JDBC connection to participate in global transactions using the Logging Last Resource (LLR) transaction optimization. This option is only available when you select a non-XA JDBC driver to make database connections.
    3. Emulate Two-Phase Commit - Enables a non-XA JDBC connection to emulate participation in distributed transactions using This option is only available when you select a non-XA JDBC driver to make database connections.
    4. One-Phase Commit - Select this option to enable the non-XA connection to participate in a global transaction as the only transaction participant. This option is only available when you select a non-XA JDBC driver to make database connections.
         Click Next to continue


    Step 7:
    On the Connection Properties page, enter values for the following properties:

    • Service Name
    • Database Name 
    • Host Name 
    • Port 
    • Database User Name
    • Password
    • Confirm Password

    Click Next to continue

    Step 8:
    On the Test Database Connection page, review the connection parameters and click Test Configuration. WebLogic attempts to create a connection from the Administration Server to the database. Results from the connection test are displayed at the top of the page. If the test is unsuccessful, you should correct any configuration errors and retry the test.

    Click Next to continue.

    Step 9:
    On the Select Targets page, select the servers or clusters on which you want to deploy the data source.

    Step 10:
    Click Finish to save the JDBC data source configuration and deploy the data source to the targets that you selected. To activate these changes, in the Change Center of the Administration Console, click Activate Changes. 

    JDBC Multi Data Sources in weblogic server


    multi data source is an abstraction around a group of data sources that provides load balancing or failover processing between the data sources associated with the multi data source. Multi data sources are bound to the JNDI tree or local application context just like data sources are bound to the JNDI tree.The Multi Data Source can be used in the same way as we use a Data Source.

    When an application requests a connection, the Multi Data Source determines which data source will provide a connection based on the selected algorithm.
    Create two or more data sources, and then create a Multi Data Source and assign data sources to the Multi Data Source.

    Configurations for the Multi Data Source.
    Algorithm Type
    Load-Balancing
    Connection requests to a load-balancing multi data source are served from any data source in the list. The multi data source selects data sources to use to satisfy connection requests using a round-robin scheme. When the multi data source provides a connection, it selects a connection from the data source listed just after the last data source that was used to provide a connection. Multi data sources that use the Load Balancing algorithm also fail over to the next data source in the list if a database connection test fails and the connection cannot be replaced, or if the data source is suspended.
    Failover
    The Failover algorithm provides an ordered list of data sources to use to satisfy connection requests. Normally, every connection request to this kind of multi data source is served by the first data source in the list. If a database connection test fails and the connection cannot be replaced, or if the data source is suspended, a connection is sought sequentially from the next data source on the list.
    FailoverRequestIfBusy
    With the Failover algorithm, this attribute enables failover when all connections in a data source are in use.
    TestFrequencySeconds
    This attribute controls the frequency at which Weblogic Server checks the health of data sources previously marked as unhealthy to see if connections can be recreated and if the data source can be re-enabled.

    JDBC Data Sources in WebLogic Server

    JDBC


    • It is an API which is used for accessing the Databases.
    • JDBC provides Platform independent access to databases


    JDBC Data Source

    In WebLogic Server, you can connect to database by adding JDBC data sources to your WebLogic domain

    • A JDBC data source is an object bound to the JNDI tree that provides database connectivity through a pool of JDBC connections. 
    • Applications can look up a data source on the JNDI tree and then borrow a database connection from a data source.
    • A Data Source:
        • Is stored in the WLS JNDI tree
        • Is associated with a connection pool
        • Can support transactions


    What is Connection Pool?

     It's a pool of connection objects which provides the connectivity between WebLogic Server and Database. It allows an application to borrow a database connection.

    Advantages of Connection Pools and Data Sources

    Connection pools are created at WebLogic Server startup. It provides
    1. Re-usability
    2. Readily available connections (Time and overhead are saved by using an existing database connection)
    3. Can be dynamically resized to accommodate increasing load
    4. The database can be changed without application developer having to modify the underlying code
    5. The number of connections to a database can be controlled

    Types of Data Sources

    1. Generic Data Source - It is nothing but a Data Source. It provides database connectivity through pool of JDBC Connections.
    2. Multi Data Source - It is abstraction around a group of data sources which provides  Load balancing or Failover. It determines which data source to use to satisfy the request depending on the algorithm selected in the Multi Data Source Configuration.
    3. Grid Link Data Soure - It provides connectivity between WebLogic Server and an Oracle Database service targeted to an Oracle Real Application Cluster (RAC). It uses the Oracle Notification Service (ONS) to adaptively respond to state changes in an Oracle RAC instance

    Node Manager Overview

    Node Manager is a WebLogic Server utility which is used to control the WebLogic Server instances remotely.Node Manager process is not associated with a specific WebLogic domain, but with a Machine.

    WebLogic Server instances in a production environment often distributed across multiple domains, machines and geographic locations.  Node manager is used to control these instances remotely.

    It is recommended  to use use node manager in production environment but not mandatory


    Note:
    You can use the same nodemanager process to control server instances in any WebLogic Server domain, as long as the server instances reside in same machine as the Node Manager Process.

    Node Manager Capabilites

    A Node Manager can be used to:

    • Start, Shutdown and Restart an Administration Server
    • Start, Shutdown, Suspend and Restart Managed Servers
    • Monitors the health of the servers
    • Automatically Restart Admin and Managed Servers on failure
    • Automatically kill WebLogic Server instances whose health state is "failed"
    • Node Manager is used in whole server migration for IP Migration and server restart on another machine

    Node Manager Types

    Basically, there are 4 types of node managers available in weblogic
    1. PLAIN
    2. SSL
    3. SSH
    4. RSH

    Accessing the Node Manager

    You can access the Node Manager from the following clients:

    Administration Console - From the Environments -- Machines -- Configurations-- Node Manager (Tab)

    WLST Commands and Scripts


    Sunday, November 18, 2012

    WebLogic Server Deployments - Part 1

    Overview of WebLogic Deployments

    In this post we will discuss about the basic terminology related WebLogic deployments.  The following sections provide a basic over view of Oracle WebLogic Server deployments:
      1. Application Deployment
      2. Deployment Process
      3. Type of Applications that you can deploy
      4. Deployment Files or Units
      5. Deployment Targets
      6. Deployment Types or Methods
      7. Deployment Tools
      8. Deployment Operations
      9. Deployment States
      10. Deployment Phases
      11. Deployment Descriptors
      12. Deployment Plan
      13. Deployment Staging Modes

    Application Deployment

    It is the process of installing and making an application or module available for processing the client requests in WebLogic Server domain.

    Deployment Process

    Deploying an application involves the following tasks:
    • Preparing - Choosing whether to package the application as an archived file or keeping it in an exploded directory
    • Configuring - Creating a deployment plan to maintain configuration changes without changing the deployment descriptors (optional)
    • Deploying - Targetting and distributing the application to WebLogic Servers in a domain


    Type of Applications that you can deploy

    By using WebLogic you can deploy:
    • Web Applications
    • Enterprise Applications
    • J2EE Librarires
    • Web Services
    • JDBC, JMS and Diagnostic Framework modules
    • Resource Adapter
    • EJB Components
    • Client Applicatin Archives

    Deployment Units or Deployment Files

    A deployment unit refers to a stand-alone J2EE module (ex: EJB or Resource Adapter) or a J2EE application ( such as Web application or Enterprise application) that can be deployed to WebLogic Server.
    You can deploy:

    • JAR (JAVA Archive) files
    • WAR (Web Archive) files
    • EAR (Enterprise Archive) files etc.,


    Deployment Targets

    A deployment taregt refers to WebLogic Server instance to which you can deploy an application or stand alone module.In WebLogic you can deploy it on:
    • Admin Server
    • Managed Servers
    • Clusters
    • Virutal Host

    Deployment Types of Deployment Methods

    • Auto Deployment
    • Console Deployment
    • Command Line Deployment
    • Side by side deployment or Redeployment

    Deployment Tools

    • Administration Console
    • Command Line Utilities 
      • weblogic.Deployer
      • WebLogic Scripting Tool (WLST) 
      • ant scripts etc.,

    Deployment Operations

    • install (deploying an application)
    • delete (un-deploying an application)
    • update
    • start 
    • stop

    Deployment States

    • New
    • Prepared
    • Admin
    • Failed
    • Active
    • Retired

    Deployment Phases

    In WebLogic the applications are deployed in two phases:

    Prepare Phase of deployment  (First Phase of the deployment)
    In the first phase, application components are distributed to the target server instances, and the planned deployment is validated to ensure that the application components can be successfully deployed. During this phase, user requests to the application being deployed are not allowed.

    Active Phase of deployment (Second Phase of the deployment)-
    In the second phase the application components will fully deployed on the target server instances, and the deployed application is made available to clients.

    Deployment Descriptor

    It describes how a module or application should be deployed. The deployment configuration for an application or module is stored in three types of XML document: Java EE deployment descriptors, WebLogic Server descriptors, and WebLogic Server deployment plans.

    Deployment descriptors are used to

    • Define application defaults such as welcome and error pages
    • Define run-time environment
    • Specify J2EE Security Constraints
    • Define work managers for the applications
    • Set the context root of application etc.,

    Deployment Plan

    • It is an optional XML document that resides outside an application archive.
    • It is used to set or override deployment property values defined in applications WebLogic Server deployment descriptor
    • It configures an application for deployment to a specific WebLogic Server environment.

    Deployment Staging Modes

    The deployment staging mode determines how deployment files are made available to target servers that must deploy an application or standalone module.  WebLogic provides three types of deployment mode options

    • stage mode
    • nostage mode
    • external_stage mode